Kiwire 3.0 Administrator - Device & Controller Setup Guide
Kiwire 3.0 Administrator - Device & Controller Setup Guide
Cambium Networks Configuration for Kiwire Hotspot
Cambium Networks Configuration for Kiwire Hotspot
Prerequisites
Before integrating the controller with Kiwire, it is necessary that the controller and access point:
-
are connected to the Internet
-
are reachable on the network
-
have an IP address assigned to the a through DHCP or static
Note:
-
Kiwire-hostname or Kiwire-ip can be obtain by contacting our technical support for our cloud customer. For enterprise client the ip will be on premises Kiwire ip address.
-
Social network hostname list can be obtained from Social network whitelist guide
Part 1: Cambium cnMaestro configuration
-
Login to your Cambium cnMaestro controller
-
Go to WLANs > Configuration > AAA Servers
-
Authentication Server
-
Host: Kiwire-hostname or Kiwire-Ip
-
Secret: create a secret pass phrase
-
Port: 1812
-
Timeout: 3 seconds
-
Attempts: 1
-
-
Accounting Server
-
Host: Kiwire-hostname or Kiwire-ip
-
Secret: secret same as authentication server
-
Port: 1813
-
Timeout: 3 seconds
-
Attempts: 1
-
Accounting Mode: Start-Interim-Stop
-
Accounting Packet: ticked
-
Interim Update Interval: 1800 seconds
-
-
Advanced Settings
-
NAS-Identifier: AP MAC address with capital letters and colon
-
Dynamic Authorization: ticked
-
Dynamic VLAN: ticked
-
Called Station ID: AP-MAC:SSID
-
-
Omaya 3.0 Administrator > Quick Setup > Dashboard
Documentation
Kiwire 3.0 Administrator > Setting up the Wi-Fi Hardware & Configuration > Mikrotik > DHCP Relay
Kiwire 3.0 Administrator - Device & Controller Setup Guide
DHCP Relay in Mikrotik Configuration for Hotspot
DHCP Relay is just a proxy that can receive a DHCP request and resend it to the real DHCP server. DHCP relay does not choose the DHCP server in the dhcp-server list, it just sends the incoming request to all the listed servers. Let us consider that you have several IP networks 'behind' other routers, but you want to keep all DHCP servers on a single router. To do this, you need a DHCP relay on your network which relies on DHCP requests from clients to DHCP server.
Prerequisites
Before configurating the DHCP Relay Mikrotik router, it is necessary that the Main Router (Can be any router) has already configured and enabled DHCP Relay.
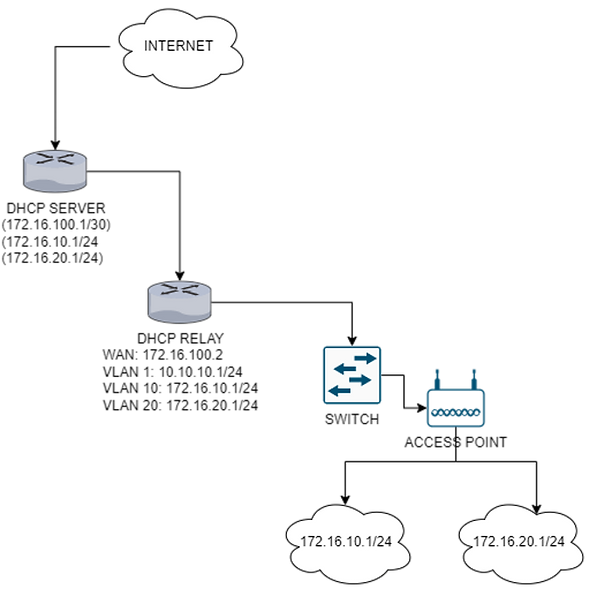
This example will show you how to configure a DHCP Relay in Mikrotik which serve 2 IP Networks and assign them to a VLAN interface and configure Hotspot for the interfaces – 172.16.10.0/24 and 172.16.20.0/24 that are behind a router DHCP-Relay.
Example Network Topology
1. Create VLAN interface
a). Go to Interfaces
b). Click on the VLAN tab, add new VLAN and rename the VLAN and assign VLAN ID accordingly

c). Follow steps “b)” again to create a second VLAN interface
d). The VLAN interfaces created will be updated in the Interface List under the eth interface which it has been assigned to, in this example we have assigned the VLAN to be on ether2.

2. Add IP Addresses in Address List
a). Go to IP > Addresses
b). Click on add new address and enter the IP Address (172.16.10.1/24) and assign it to the VLAN interface (VLAN 10) that have just been created

c). Repeat the steps at “b)” for the second network and VLAN 20

d). Add another address for WAN port at ether1, this is to allow the DHCP-Relay router to be reachable to DHCP-Server router via static route.

3. Enable static route from DHCP-Relay to DHCP-Server
a). Enter the dst-address as 0.0.0.0/0 and the gateway accordingly. This example will use 172.16.100.1 as its gateway

b). DHCP-Relay will now be reachable to internet through the DHCP-Server

4. Enable DHCP Relay
a). Go to IP > DHCP Relay
b). Click on add new DHCP Relay and rename the DHCP Relay and assign it to the correct interface. In this example is the VLAN10 interface.
DHCP Server = Gateway of the DHCP-Relay
Local Address = Gateway of the VLAN10 interface

c). Repeat the same steps for VLAN20 interface

5. Create HotSpot
a). Go to IP > HotSpot
b). Click on create new hotspot. Rename the hotspot server accordingly and assign it to the interface where in this example is VLAN 10. As this is a dhcp-relay hotspot, using the Hotspot Setup wizard is not applicable

c). Repeat the steps for VLAN20
