Kiwire 3.0 Administrator - Device & Controller Setup Guide
Kiwire 3.0 Administrator - Device & Controller Setup Guide
Cambium Networks Configuration for Kiwire Hotspot
Cambium Networks Configuration for Kiwire Hotspot
Prerequisites
Before integrating the controller with Kiwire, it is necessary that the controller and access point:
-
are connected to the Internet
-
are reachable on the network
-
have an IP address assigned to the a through DHCP or static
Note:
-
Kiwire-hostname or Kiwire-ip can be obtain by contacting our technical support for our cloud customer. For enterprise client the ip will be on premises Kiwire ip address.
-
Social network hostname list can be obtained from Social network whitelist guide
Part 1: Cambium cnMaestro configuration
-
Login to your Cambium cnMaestro controller
-
Go to WLANs > Configuration > AAA Servers
-
Authentication Server
-
Host: Kiwire-hostname or Kiwire-Ip
-
Secret: create a secret pass phrase
-
Port: 1812
-
Timeout: 3 seconds
-
Attempts: 1
-
-
Accounting Server
-
Host: Kiwire-hostname or Kiwire-ip
-
Secret: secret same as authentication server
-
Port: 1813
-
Timeout: 3 seconds
-
Attempts: 1
-
Accounting Mode: Start-Interim-Stop
-
Accounting Packet: ticked
-
Interim Update Interval: 1800 seconds
-
-
Advanced Settings
-
NAS-Identifier: AP MAC address with capital letters and colon
-
Dynamic Authorization: ticked
-
Dynamic VLAN: ticked
-
Called Station ID: AP-MAC:SSID
-
-
Omaya 3.0 Administrator > Quick Setup > Dashboard
Documentation
Kiwire 3.0 Administrator > Setting up the Wi-Fi Hardware & Configuration > Fortigate FortiOS
Kiwire 3.0 Administrator - Device & Controller Setup Guide
Fortigate FortiOS configuration for Kiwire hotspot
Steps to Integrate Kiwire with FortiGate
1. Create RADIUS Server
User & Devices→Radius Servers
A). Edit Radius Server
-
Name = Radius name (e.g., Kiwire)
-
Authentication Method = Specify→choose PAP
-
NAS IP = FortiGate WAN IP
B). Primary Server
-
IP/Name = Kiwire IP/Hostname
-
Secret = Secret key (make sure this secret key is same in Kiwire)
2). Click OK

1
2
3
4
5
6
3. Set Accounting Interim Updates
Click CLI Console

4. CLI Console should be open like in the diagram below

5. Enter command below to set accounting interim update
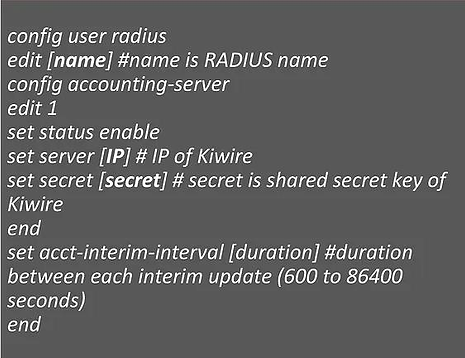
6. Output should like this when done set accounting interim update

6. Add User Group
User & Device → User Groups → Create New
A). Edit User Group
-
Name = User group name
-
Type = Firewall
-
Members = Add User Definition
B). Remote Groups
-
Click Add → Add Radius server that have created
C). Click OK

7. Add User Definiton
User & Device → User Definition → Create New → Remote Radius User → Click Next

8. On Radius Server tab
-
Username = fill in name
-
RADIUS Server = choose Radius server
-
Skip to Extra Info tab

9. On Extra Info tab
-
User Account Status = Enabled
-
User Group = choose User Group that have created
-
Click Submit

10. The output should look like in the diagram below

11. Create Hotspot Interface
Go to Network→Interfaces→Create New→Interface
A. Edit Interface
-
Interface name = Set name to the interface
-
Type = VLAN or physical interface
-
Interface = If type is VLAN, choose physical interface
-
VLAN ID = Set VLAN ID if type is VLAN
B. Address
-
Addressing Mode = Manual
-
IP/Network Mask = Hotspot subnet
C. Administrative Access
-
Tick RADIUS Accounting
-
Tick PING

D. DHCP Server → Enable
-
Address Range = IP range that will used as DHCP
-
Netmask = Netmask for the IP
-
Default Gateway = Same as Interface IP
-
DNS Server = Same as System DNS
E. Network
-
Security Mode = choose Captive Portal
-
Authentication Portal = External (IP-Kiwire/login/fortiap)
-
User Access = Restricted to Groups
-
User Groups = choose User Group that have created
-
Click OK

12. Wall Garden Kiwire
Go to Policy & Objects → Addresses → Create New → Addresses
-
Name = Set name for the address
-
Type = Subnet (if Kiwire using IP) /FQDN (if Kiwire using hostname)
-
IP/Netmask (if choose type Subnet) = Kiwire IP
-
FQDN (if choose type FQDN) = Kiwire hostname
-
Click OK

-
Name = Set name for the address
-
Type = IP Range
-
IP Range = IP Range for hotspot
-
Click OK

13. Create Policy for Unauthenticated User
Go to Policy & Objects→IPV4 Policy→Create New
-
Name = Set Name for the policy
-
Incoming Interface = VLAN or interface create for hotspot
-
Outgoing Interface = wan1
-
Source = all
-
Destination = choose Kiwire wallgarden
-
Schedule = always
-
Service = ALL
-
Action = ACCEPT
-
Click OK

14. Open CLI Console to enable bypass of the Captive Portal

15. Create Internet Access Security Policy
On the same page IPV4 Policy → Create New
A. Edit Policy
-
Name = Set name for the policy
-
Incoming = VLAN or physical interface hotspot
-
Outgoing Interface = WAN1
-
Source = all
-
Destination = all
-
Schedule = always
-
Service = ALL
-
Action = ACCEPT
B. Firewall/Network Options
-
NAT = Enable
-
IP Pool Configuration = Use Outgoing Interface Address
C. Click OK

16. Create DNS Policy
On same page → Create New
-
Edit Policy
-
Name = set policy name
-
Incoming Interface = VLAN or physical interface hotspot
-
Outgoing Interface = wan1
-
Source = all
-
Destination = all
-
Schedule = always
-
Service = DNS
-
Action = Accept
-
-
Firewall/Network Options
-
NAT = Enable
-
IP Pool Configuration = Use Outgoing Interface Address
-
-
Click OK

D. Policy list should look like in the diagram below

17. Redirection after login
Click CLI Console

Kiwire Configuration
1. Access to Kiwire→Devices→Devices→Add Device

2. Fill in the details as below:
-
Device Type = Controller
-
Vendor = FortiAP
-
Identity = FortiGate Hostname
-
IP Address = FortiGate IP
-
Username = FortiGate username
-
Password = FortiGate password
-
Shared Secret Key = Secret key that create in Radius server part. Must be same
-
COA Port = 3799
-
Click Create
