Kiwire 3.0 Administrator - Device & Controller Setup Guide
Kiwire 3.0 Administrator - Device & Controller Setup Guide
Cambium Networks Configuration for Kiwire Hotspot
Cambium Networks Configuration for Kiwire Hotspot
Prerequisites
Before integrating the controller with Kiwire, it is necessary that the controller and access point:
-
are connected to the Internet
-
are reachable on the network
-
have an IP address assigned to the a through DHCP or static
Note:
-
Kiwire-hostname or Kiwire-ip can be obtain by contacting our technical support for our cloud customer. For enterprise client the ip will be on premises Kiwire ip address.
-
Social network hostname list can be obtained from Social network whitelist guide
Part 1: Cambium cnMaestro configuration
-
Login to your Cambium cnMaestro controller
-
Go to WLANs > Configuration > AAA Servers
-
Authentication Server
-
Host: Kiwire-hostname or Kiwire-Ip
-
Secret: create a secret pass phrase
-
Port: 1812
-
Timeout: 3 seconds
-
Attempts: 1
-
-
Accounting Server
-
Host: Kiwire-hostname or Kiwire-ip
-
Secret: secret same as authentication server
-
Port: 1813
-
Timeout: 3 seconds
-
Attempts: 1
-
Accounting Mode: Start-Interim-Stop
-
Accounting Packet: ticked
-
Interim Update Interval: 1800 seconds
-
-
Advanced Settings
-
NAS-Identifier: AP MAC address with capital letters and colon
-
Dynamic Authorization: ticked
-
Dynamic VLAN: ticked
-
Called Station ID: AP-MAC:SSID
-
-
Omaya 3.0 Administrator > Quick Setup > Dashboard
Documentation
Kiwire 3.0 Administrator > Setting up the Wi-Fi Hardware & Configuration > Cisco Meraki
Kiwire 3.0 Administrator - Device & Controller Setup Guide
Cisco Meraki Cloud Controller Configuration for Kiwire Hotspot
A. Access control configuration
-
Login to your Meraki cloud controller.
-
Go to Wireless > Access control tab
-
Select SSID for captive portal
-
Select Open (noencryption) for Association requirements
-
Select Disable Mandatory DHCP for Mandatory DHCP
-
Select Sign-on with my RADIUS server under Splash Page
-
Select Block all access until sign-on is complete for Captive
portal strength
-
Select Walled garden is enabled for Walled garden
-
Wall garden ranges
-
fonts.googleapis.com
-
fonts.googlestaic.com
-
Kiwire-ip address
-
social networks hostname or ip addresses (optional)
-
-
Select Allow simultaneous devices per user for Simultaneous logins
-
Select Default for your settings: Restricted for Controller disconnection behaviour
-
RADIUS for splash page
-
Host: Kiwire-hostname or Kiwire-ip
-
Port: 1812
-
Secret: create a secret
-
-
RADIUS accounting servers is enabled (refer Cisco Meraki support is this option is not available)
-
Host: Kiwire-hostname or Kiwire-ip
-
Port: 1813
-
Secret: create a secret key phrase
-
-
Enable data-carrier detect (DCD) is disabled
-
Select Deny access for Failover policy
-
Select Strict priority order for Load balancing policy
-
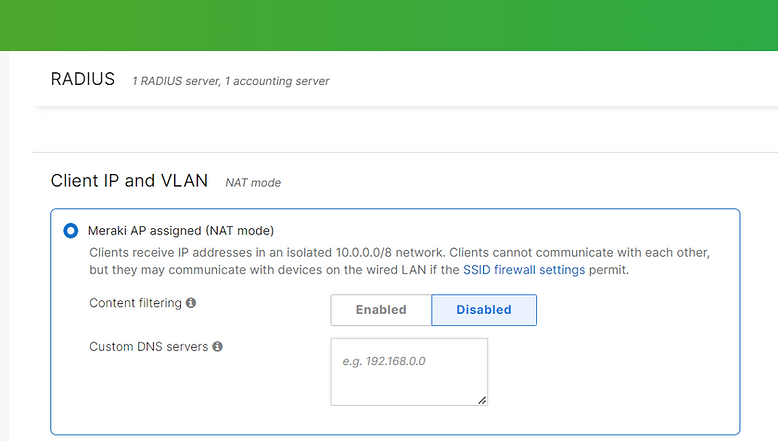
Select Bridge mode: Make clients part of the LAN for Client IP
assignment.
-
Select Disable Bonjour Forwarding for Bonjour forwarding
-
Enable VLAN tagging if needed and insert VLAN ID
-
Select Disabled: Do not assign group policies automatically for Assign group policies by device type

STEP 1
STEP 2

STEP 3
STEP 4
.png)
STEP 5

STEP 6

STEP 7
STEP 8
STEP 9
STEP 10
STEP 11

STEP 12
STEP 13

STEP 14
STEP 15
STEP 16
STEP 17

STEP 18
STEP 19
STEP 20
STEP 21
21. If use NAT Mode, Select disabled content for Content filtering
22. Save Changes
B. Splash Page configuration
-
Go to Wireless > Splash Page
-
Select SSID
-
Use Custom splash URL and insert http://<kiwire-ip>/login/meraki
-
Save changes.

C. SSID configuration
-
Go to Wireless > SSIDs
-
Enable captive portal SSID and create SSID
-
Save Changes

Part 2: Kiwire configuration
1. Adding NAS into Kiwire
-
Navigate to Devices > Devices > Add Device
-
Device Type → Controller
-
Vendor → Meraki
-
Identity → AP mac address ( delimiter colon and small letter format eg : 0c:51:aa:52:e4 )
-
IP Address → Cisco Meraki Controller IP address or hostname o Address → optional
-
Username → optional
-
Password → optional
-
Shared Secret Key → Secret key phrase set at Meraki cloud
-
COA Port → 3799
-
Description → optional
-
Monitoring Method → optional
-
Community → optional
-
Snmp version → optional
-
Create→ to save