Login Engines - Sign up Page
- synchrowebmarketing
- Oct 9, 2020
- 2 min read
The sign up page module let you configure the sign up process for users. There are three types of sign up such as public sign up, MAC sign up and guest sign up. Public sign up are designed for public area sign up where users will simply register their own account and login to the network. You may put additional data field that user are required to fill in during the sign up process. Guest sign up are signup that required a authorised sponsor to authorised the user prior allow connect to network. This is usually used in corporate meeting room where visitor require network access.
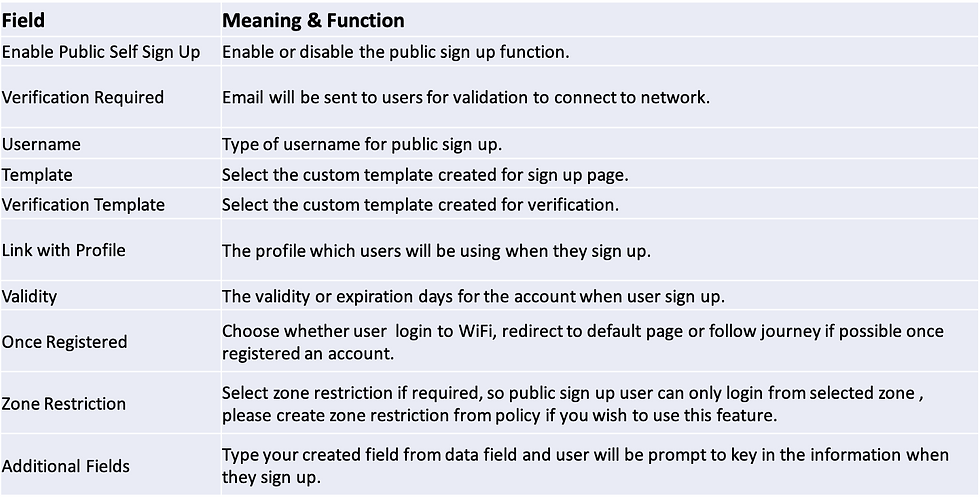
Public Sign up
The public sign up tab let you configure the public sign up modules. Public sign up users are usually for public area where users can fill in their information and connect to the network. The field and its function description is listed below.
MAC Sign-Up
The MAC Sign Up tab let you configure the MAC sign up modules. The field and its function description is listed below.

Guest Sign Up
The guest sign up tab let you configure the guest sign up modules. Guest sign up modules will require an approval process from a sponsor within your organisation. The process flow for guest sign up as below:-
Guest will fill in their information on the signup page and the system will send a “Click to approve” email to the sponsor.
Sponsor need to click on the link to approve the guest to proceed to internet. A temporary account will be given to guest which guest can use it to login during the validity of the accounts. This to ensure only authorized guest/users are allowed to connect to the network.
The field and its function description is listed below.

Data fields
The Data fields tab let you create additional field that user requires to fill in during the sign up process. Data collected from the sign up page can be view at Reports > Insight > Visitor Registration Data. The field and its function description is listed below. Create New Data Fields
Click on “Create New Data Fields” button and populate the required fields. Fill in the field to complete the process.
The field and its function description is listed below.

How to create new data fields?
Click on the “Create New Data Fields” button to create new data field. Then fill the following fields to create a new data fields.
Click create to save your newly added data field.
Now click on sign up page link again from navigation to reload the signup page with new data field added to system, to be ready to add to signup page options.
* NOTE : When you add new or delete data field to either public or guest sign up page ,you need to use page maker to edit the page with the signup snippet to refresh with new data field attach and save the page to take effect. Assigning data fields to sign up page* NOTE : Please ensure the page is reload via navigation menu to ensure the newly created data field is loaded for sign up page option.
Select the tab either public sign up or guest sign up.
Click on the “Additional Fields” options and select the data field you which to be included.
Now save the setting.
Comments