Device & Controller Setup Guide - FortiWiFi Device Configuration for Kiwire
- synchrowebmarketing
- Oct 26, 2020
- 2 min read
A. FortiWiFi (Firmware version 5.2) Configuration
Step 1 – Setup the FortiWiFi Hostname.
In the settings, under the tab System / Dashboard / Status you need to change the hostname with the following settings:


Step 2 – Add the RADIUS server.
Under the tab User&Device / RADIUS Servers you need to create a record for primary RADIUS server with the following settings:

Step 3 – Configure a FortiGate unit to send accounting interim updates to the Kiwire server to update the status of an active session.
In the CLI console, run the following command: config user radius edit [name] #name Kiwire config accounting-server edit 1 set status enable set server [IP] # IP of Kiwire set secret [secret] # shared secret key end set acct-interim-interval [duration] #duration between each interim update (600 to 86400 seconds) end
Here is the sample output:

Step 4 – You can also test a FortiGate user authentication to Kiwire server. Below is the RADIUS diagnostic command: Fortigate # diagnose test authserver radius radius-server pap user1 password1 Here is the sample output:

Step 5 – Create a user in User&Device / User Definition settings:

Step 6 – Go to User&Device / User Groups and create an authentication group.

Step 7 – Create a “WALLED GARDEN” to allow the user to get the content through the Kiwire Page to connect you need to allow specific IP addresses.
go to Policy & Objects / Addresses.
You can create required records based on the table below. Merge them under one title to make it more clean to understand and allow better management.
Specific records for Google, Facebook and Twitter should be created only when you use social networks for authentication.


Step 8 – Add the Synchroweb socialgate.

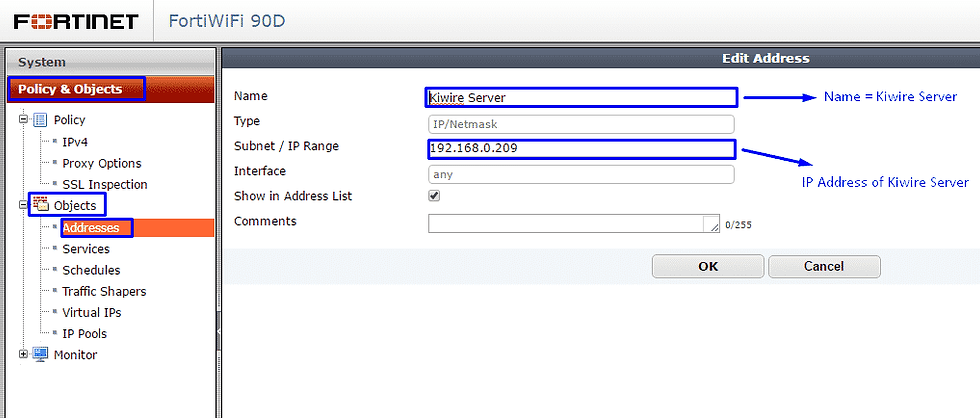
Step 9 – Go to Policy & Objects > Objects > Addresses and create an address for the captive portal.
Step 10 – Create Security Policy.
Go to Policy & Objects > Policy > IPv4
Create a security policy for unauthenticated users that allows access only to the captive portal.

Step 11 – In the CLI, enable bypass of the captive portal so that the user can make the initial contact with the external server.

Step 12 – Create the Internet access security policy.
The first rule for allowing the access to selected sources for not-authenticated users


Step 13 – Create the WiFi Network.
Go to System > Network > Interface to create the WiFi SSID with the following settings:


B. Kiwire Configuration
Step 1 – Add new NAS.
Login to Kiwire Captive Portal “http://Kiwire_IP_Address/admin”
Go to Device > NAS and add NAS for FortiAP

Step 2 – Create New Zone.
Go to Device > Zone and create a zone for the FortiWiFi. We can assign the zone based on NAS ID, VLAN, IP address, or SSID.
After that, edit the zone and click AddFinally, you have completed the configuration of both Kiwire and FortiWiFi. Next is you need to design a landing page, create user profile and create user and assign the landing page to the zone desired. You may refer to the Kiwire 2.0 Main Section for setting up landing page, user profile, users, and other details of Kiwire.
Configuration is now complete.
*For configuration of Captive Portal on LAN interface, just amend the External Authentication Portal where we need to add “?nasid=[FortiWiFi MAC Address]
Comments