Kiwire 3.0 Administrator - Device & Controller Setup Guide
Kiwire 3.0 Administrator - Device & Controller Setup Guide
Cambium Networks Configuration for Kiwire Hotspot
Cambium Networks Configuration for Kiwire Hotspot
Prerequisites
Before integrating the controller with Kiwire, it is necessary that the controller and access point:
-
are connected to the Internet
-
are reachable on the network
-
have an IP address assigned to the a through DHCP or static
Note:
-
Kiwire-hostname or Kiwire-ip can be obtain by contacting our technical support for our cloud customer. For enterprise client the ip will be on premises Kiwire ip address.
-
Social network hostname list can be obtained from Social network whitelist guide
Part 1: Cambium cnMaestro configuration
-
Login to your Cambium cnMaestro controller
-
Go to WLANs > Configuration > AAA Servers
-
Authentication Server
-
Host: Kiwire-hostname or Kiwire-Ip
-
Secret: create a secret pass phrase
-
Port: 1812
-
Timeout: 3 seconds
-
Attempts: 1
-
-
Accounting Server
-
Host: Kiwire-hostname or Kiwire-ip
-
Secret: secret same as authentication server
-
Port: 1813
-
Timeout: 3 seconds
-
Attempts: 1
-
Accounting Mode: Start-Interim-Stop
-
Accounting Packet: ticked
-
Interim Update Interval: 1800 seconds
-
-
Advanced Settings
-
NAS-Identifier: AP MAC address with capital letters and colon
-
Dynamic Authorization: ticked
-
Dynamic VLAN: ticked
-
Called Station ID: AP-MAC:SSID
-
-
Omaya 3.0 Administrator > Quick Setup > Dashboard
Documentation
Kiwire 3.0 Administrator > Login Engine > Page Designer
Kiwire 3.0 Administrator - Marketing & Campaigns
Login Engine - Page Designer
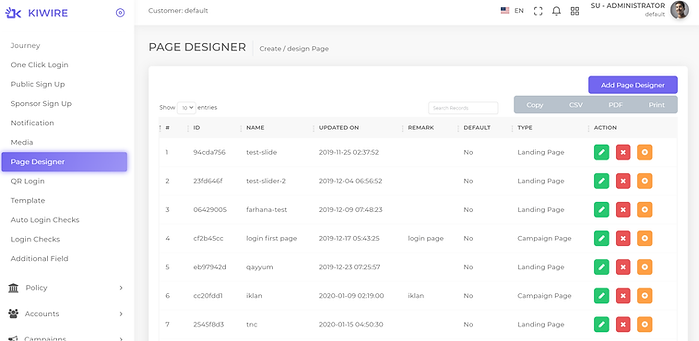
In order to offer a truly personalized platform for user login experience, we created the “Page Designer” module. Page designer module is a powerful platform that let you create pages for sign up, informative pages and login pages which are personalized to your unique organisation. Page designer editor let you drag and drop snippet/box of content and let you customize the login page to your own. This module let you design your page creatively without the requirement of doing html programming. With each update of Kiwire platform, new snippet will be introduced which enable future login mechanism and logic to be introduced to your network. To access the page designer module click on Login Engine > Page Designer and the Page Designer module screen will display the existing listing of the added pages in system.

The field and its function description is listed below.
NOTE:
You are required to create an initial login page for your platform to work. If not user will be encounter a warning page of “No login page being created!”. Please create an initial login page and set it to be default.
Page Designer Editor
Click on the edit icon to access the page designer editor. The page designer editor consist of one primary pane on right hand side. The R.H.S pane is the primary snippet container which you can drag and drop the snippet box into the main canvas. On top of the pane there is select box where you can choose different categories for page designs.

1. Click on the “Add Page Designer” button to create a new page.
2. The Page Designer will load.
3. To set a background for the page, click on “Click to add content” and a popup window will appear as below
Click on “Image” a default image will be opened, then click on image, It will show 3 options, Click on “Change Image” to select the background. It supported image format (.jpeg, .png, .gif, .bmp) to their respective categories to proceed. Any background uploaded under “Desktop Size” will only appear for desktop. If there is no image uploaded for “Tablet Size” or “Mobile Size” the default background image for desktop will be used. Click “Upload” to set the background.
4. When you click on a paragraph, it shows default text. The typography option is displayed UP on text box to edit the text such as font size, font color, bold and many more.
5. Open the snippet selection box by clicking on the snippet box loader on the R.H.S to shows all the snippet blocks.
6. Drag and drop the required snippet block into the main canvas area from the snippet selection box.
7. Most of the snippet block are editable, just click on the snippet and hover the edit icon will display.
8. The first icon display 3 dots, it shows options to Add, Move Up, Move Down and duplicate.
9. The second icon is the HTML editor. Page maker support the HTML / CSS code. After finish editing on html editor, click on “OK” button to save the code.
10. The third icon is the delete icon to delete the block.
11. Most of the snippet box are editable, just click on the snippet and hover the edit icon will display.
12. Once done with the new customized page, click on “Save” button on the page.
13. At the save option, type the Page Name, Page Unique ID is automatically generated, Remark, Page Type and Check enable the default page then click “Save” button.
14. To edit the previous page, click on the edit icon and make the changes. After done with changes, click on “Save” button to save the page.
SAVE PAGE DEGISNER
Click on the save button at the upper left of the page to save your page impression. Then, you will require to fill in the details as below.

The field and its function description is listed below.
NOTE:
Only 1 Default Page is allowed.
DELETE PAGE DESIGNER
Click on the delete icon to delete the page maker. A prompt will be display to ask for your confirmation to proceed to delete the page maker. Please exercise with cautions as this not a reversible action.